Difference between revisions of "Adding a new drive from the command line"
| (3 intermediate revisions by the same user not shown) | |||
| Line 79: | Line 79: | ||
& add the line: | & add the line: | ||
/dev/sdb1 /MOUNTPOINT ext4 defaults 0 0 | /dev/'''sdb1''' '''/MOUNTPOINT''' ext4 defaults 0 0 | ||
or, by label: | or, by label: | ||
LABEL='''VOLUME-LABEL''' /MOUNTPOINT ext4 defaults 0 0 | LABEL='''VOLUME-LABEL''' '''/MOUNTPOINT''' ext4 defaults 0 0 | ||
* <code>sudo systemctl daemon-reload</code> | |||
Go ahead and mount it(them) now: | |||
* <code>sudo mount -a</code> | |||
= Some Links = | = Some Links = | ||
Latest revision as of 17:33, 3 February 2025
| 11 (bullseye) | (This includes LMDE5, Proxmox, OMV...) | |
| A little note about typographic conventions you'll see here | ||
Connect the drive
Either plug the drive into the machine with the power off or hot-swap it in if possible...
(Yes... Adding a new drive to an ESXi or Proxmox VM is just like hot-swapping.)
Determine the device
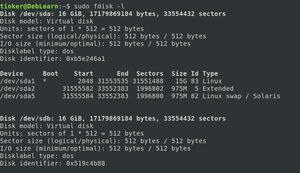
sudo fdisk -l
fdisk is a dialog-driven program for creation and manipulation of partition tables.
man fdisk- for details...
You'll see a fair bit of output.
- Blocks starting with Disk /dev/sd_: indicate drives and provide details about them.
- Blocks starting with Device Boot Start... indicate partitions on those drives.
- In the case of an unformatted new drive, you'll see a Disk block that's not followed by a Device block. Make note of it's name (/dev/sd_)
- In our example, it's /dev/sdb
If your drive is previously used
sudo fdisk /dev/sdbg- To create a new empty GPT partition table
w- To write the partition table to the drive.
Partition the drive
For now, we'll just make the new drive one partition.
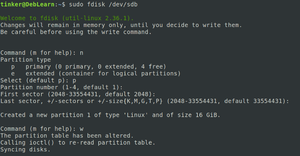
sudo fdisk /dev/sdbn- To create a new partition
p- To make it a primary partition
- Hit
Enter- 3 times to pick the default values.
w- To write the partition table to the drive.
Format the drive
Of course, the drive needs to be formatted before you can use it.
We'll go with Ext4 for now.
sudo mkfs.ext4 /dev/sdb1
A Little Note: You can actually format the whole drive without partitioning it.
Label the drive
In order to make handling drives a little easier, it is often useful to give partitions human-readable names.
sudo e2label /dev/sdb1 VOLUME-LABEL
Will label the partition we've been working with as VOLUME-LABEL. Now, any time you want to work with it using utilities that support labels, it'll be easier to keep track of which drive you're referring to.
Mount the drive
Create a mount point for the drive:
sudo mkdir /MOUNTPOINT
& mount it for use:
sudo mount /dev/sdb1 /MOUNTPOINT
If you labelled it, you can mount by label:
sudo mount -L VOLUME-LABEL /MOUNTPOINT
Make the mounting automatic
sudo vi /etc/fstab
& add the line:
/dev/sdb1 /MOUNTPOINT ext4 defaults 0 0
or, by label:
LABEL=VOLUME-LABEL /MOUNTPOINT ext4 defaults 0 0
sudo systemctl daemon-reload
Go ahead and mount it(them) now:
sudo mount -a


